Wednesday, May 27, 2009

Risotto

Making risotto is time consuming. It is time consuming in a way that chains you to the stove. That, in fact, is part of what makes it so special, and so rewarding. I don't mind at all being chained to the stove while cooking risotto, because the aromas wafting up from the simmering pot are almost as good as eating the dish itself: sizzling shallots, butter, gently simmering white wine... I never turn the vent fan on when I'm cooking this dish.


A basic risotto is very simple. Once the basic concept and pattern is established, it's pretty easy to shake things up a bit. You can vary the ingredients to make it more complicated, adding meat, seafood, various vegetables, or mushrooms, or by changing the type of broth or wine used to cook the rice. This here is a pretty basic recipe.

You need:

1.5 c Arborio rice
1.5 c white wine
2 c chicken or veggie stock
1/2 c finely chopped shallots (you can use onions if you must)
3 tablespoons of butter
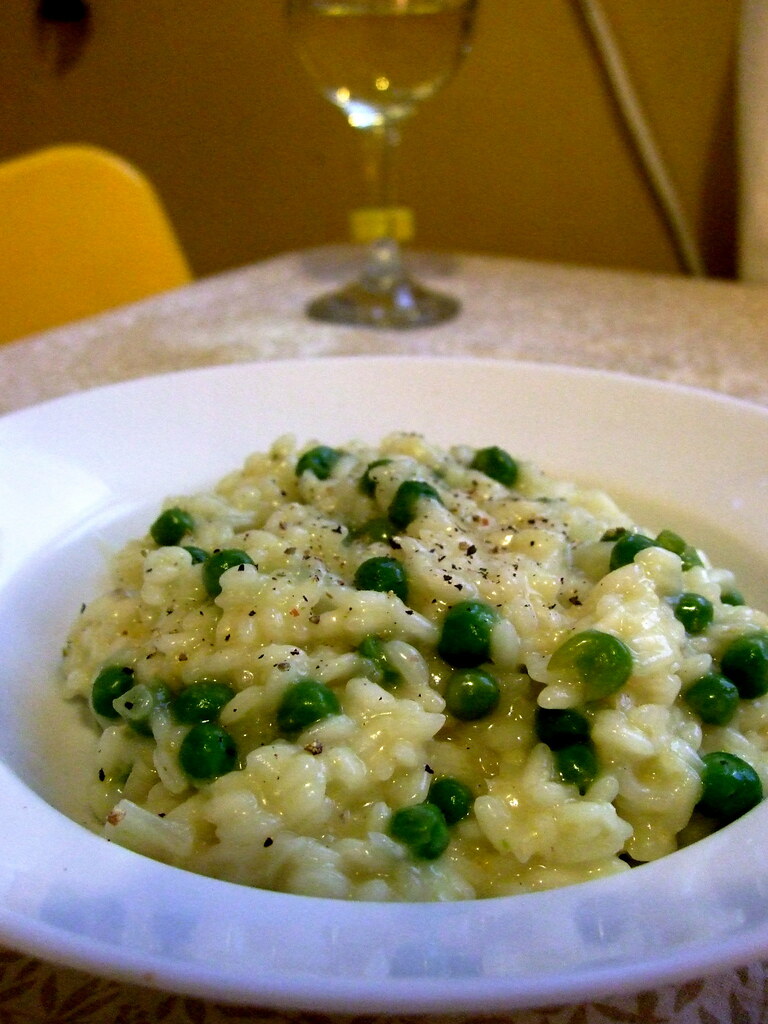
1 c frozen peas
1/2 c grated Parmesan cheese

Note: you can use medium or short grain rice if you have to, but the Italian Arborio rice really works the best. Also, pick a white wine that you would drink. This is the general rule for cooking with wine. Plus, then you can drink some as you go! :)

What you do:

1. Melt 2 tbs of the butter over medium-low heat in a large saucepan and add the shallots. Cook for about 2 minutes, until they start to get soft. Add the rice and cook for about 3 more minutes, until the rice turns translucent around the edges.

2. Add 1/2 c of the wine and stir constantly (you will hear this a lot) until the liquid is all but absorbed.

3. Add the stock 1/2 c at a time, stirring constantly to absorb all the liquid before adding the next 1/2 c. This will take about 15 minutes.

4. If the stock is gone and your rice is still raw, it's time to add more wine. You should, of course, pour a glass for yourself! Just to make sure it's ok, you understand. Add as much wine as you need, 1/2 cup at a time, as above, until the rice is cooked through but still has a "bite" to it. It is important to add it very slowly because otherwise you might get rice soup and that is no fun.

5. After the stock is gone, add in your cup of peas. They will cook quickly in the wine and rice. When the rice is *almost* cooked and your liquid is almost absorbed, stir in the parmesan cheese and the last tbs of butter.

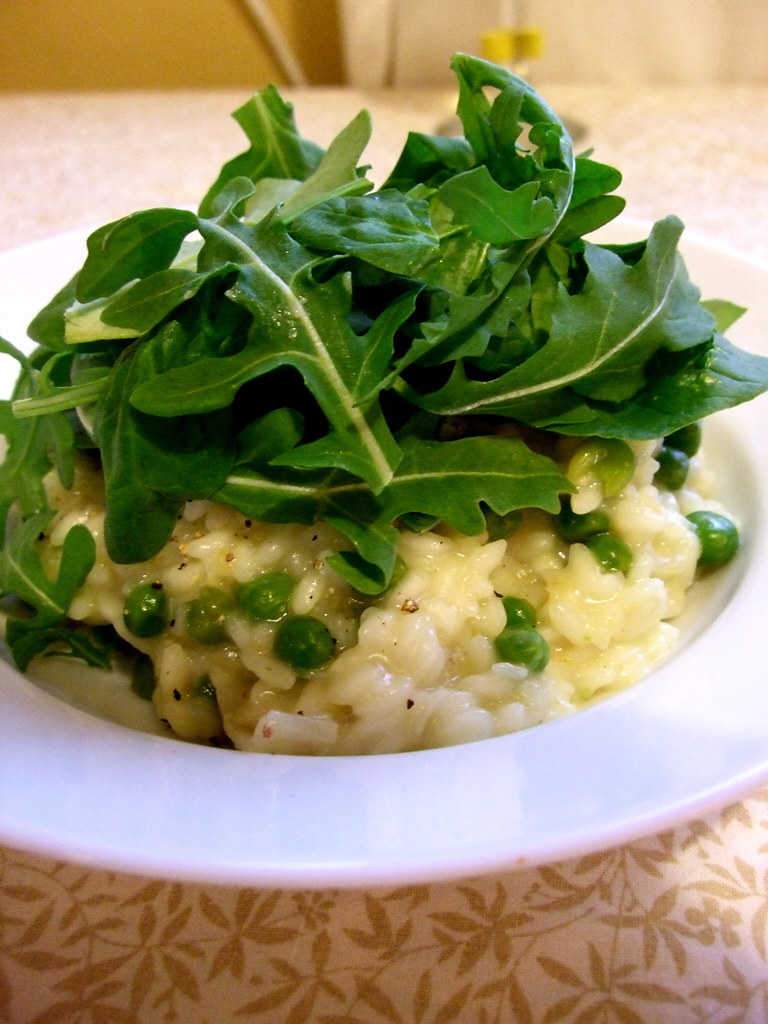
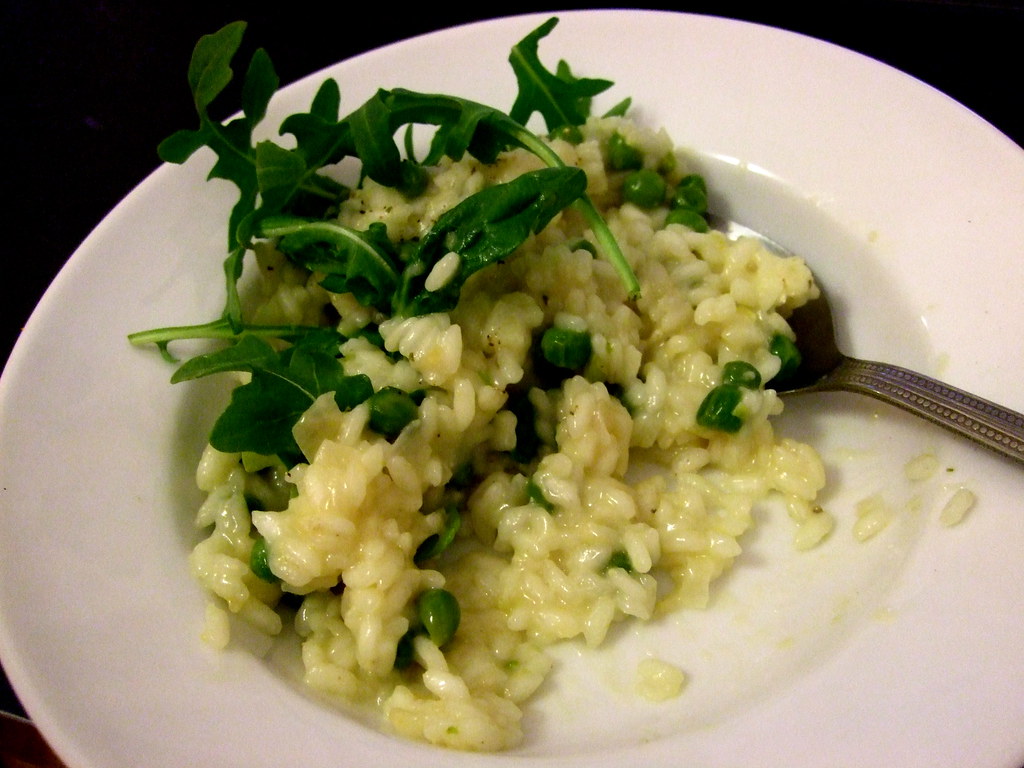
6. Serve in bowls. I topped mine with a handful of baby spinach leaves and arugula, which added a nice bite to contrast with the sweet peas and the tangy rice. Enjoy, obviously with a glass of wine.


Digg Technorati Delicious StumbleUpon Reddit BlinkList Furl Mixx Facebook Google Bookmark Yahoo

Tuesday, May 26, 2009

Cheater's Ciabatta

Normally, ciabatta, the delicious, porous, Italian bread, takes hours and hours of waiting. The gluten strands that make those nice, big, ready-for-butter holes take time to develop. You can cheat a bit, though.

The reason all those no-knead breads work is that if you give bread dough enough time, the gluten strands will develop on their own. They just need 18-24 hours to do so. Usually we knead bread to speed up the development of the gluten so that a loaf of French bread might only take 8-10 hours. It's kind of logical that if you leave a dough for a long time and don't have to knead it, you'd be able to knead the dough a lot and not have to wait, right?


This ciabatta recipe only takes 4-5 hours because you knead this dough within an inch of its life. Once again, The Fresh Loaf has come to the rescue and made last-minute fresh bread possible.

-------

You need:
500g bread flour (I used all-purpose and added a few tbs of vital wheat gluten - kind of an experiment)
475g water
15 g salt
2 tsp yeast

Directions (from the above link):

1. In Kitchen Aid style mixer: Mix all ingredients roughly till combined with paddle, let it rest for 10 minutes.

2. With the paddle , beat the living hell out of the batter; it will start out like pancake batter but in anywhere from 10 to 30 minutes it will set up and work like a very sticky dough. if it starts climbing too soon, then switch to the hook. You'll know it's done when it separates from the side of the bowl and starts to climb up your hook/paddle and just coming off the bottom of the bowl. I mean this literally about the climbing, i once didn't pay attention and it climbed up my paddle into the greasy inner workings of the mixer. It was not pretty! Anyway, it will definetely pass the windowpane test. (Note: See a great picture tutorial on what it's supposed to look like here.)

3. Place into a well oiled container and let it triple! it must triple! For me this took about 2.5 hours

4. Empty on to a floured counter, cut into 3 or 4 pieces. Spray with oil and dust with lots o' flour. Let them proof for about 45 minutes, which gives you enough time to crank that oven up to 500F.


5. After 45 minutes or so the loaves should be puffy and wobbly. Now it's iron fist, velvet glove time. Pick up and stretch into your final ciabatta shape (~10" oblong rectangle) and flip them upside down (this redistributes the bubbles, so you get even bubbles throughout), and onto parchment or a heavily floured peel. Try to do it in one motion and be gentle, it might look like you've ruined them completely, but the oven spring is immense on these things.

6. Bake at 500F , rotating 180 degrees half way through.


-------

The crumb in this bread is great - big and porous - and the crust is delicious - golden and chewy. I usually make a few loaves of french bread the long way every two weeks or so and freeze extra, but I think this way will enable me to have fresh bread every day if I wanted to!

I'm pretty sure I didn't stretch mine out enough - it looked so flat when I put it in the oven, but the recipe is right - big oven spring! I think "real" ciabatta is supposed to be a bit flatter.

Also, if you don't have a kitchen aid or something like that, you can, of course, beat the living daylights out of your dough by hand - it'll just take a bit longer and your arm may fall off.

Digg Technorati Delicious StumbleUpon Reddit BlinkList Furl Mixx Facebook Google Bookmark Yahoo

Friday, May 22, 2009

Paprika-Braised Chicken with Chickpea Puree and Crispy Shallots

Once again, Serious Eats saves the day.


This dish is very inexpensive to prepare and uses pantry staples to create something innovative and impressive. We were having company when we decided to make this, and it was a good choice, being economical enough to serve to a crowd, but at the same time not seeming like it.


For four eaters, you need (adapted from above link):

For the chicken
8 skin-on chicken pieces (thighs and drumsticks work best)
seasoned flour for dredging
4 tablespoons vegetable oil
4 oz salt pork, rind removed and finely diced (or pancetta!)
2 medium carrots, finely diced
2 medium onions, finely chopped
about 3.5 c. chicken stock (or two cans)
1 teaspoon paprika, preferably smoked
1 10oz package of frozen chopped spinach, thawed
4 tablespoons corn starch, dissolved in 1 tablespoon water
Salt and freshly ground black pepper

For the crispy shallots
2 large shallots, thinly sliced
Vegetable oil for deep-frying

For the puree
4 c cooked chickpeas (make your own! it's easy!)
1/2 cup water (I used chicken stock for extra yum)
2 tablespoon extra virgin olive oil
1 teaspoon ground cumin
Salt and freshly ground black pepper


What to do (again, adapted from the above link):

1. Place the chickpeas, water, olive oil and ground cumin in a food processor or blender. Blend until texture is creamy and uniform, adding more water if necessary, 1 tablespoon at a time.

2. Place the shallots in a small saucepan and cover with vegetable oil. On low heat, bring oil to a simmer. Maintain a low, steady heat until shallots are golden brown, then remove with a slotted spoon and transfer to paper towels to drain.

3. Pat chicken dry and dredge in seasoned flour, dusting off excess. Heat vegetable oil in a large, heavy saucepan over moderate heat, until hot but not smoking. Place chicken pieces skin-side down in hot oil and sear 6-8 minutes, transferring to a plate once skin is golden brown.

4. Discard left-over oil and reduce heat to low. In the same saucepan, cook salt pork until crispy, about 4 minutes. Add carrots and onions, stirring to coat in rendered pork fat, and cook until onion is translucent.

5. Add chicken broth and paprika and deglaze pan by boiling and scraping up any brown bits, 1 minute. Return chicken to pan, skin-side up, along with any juices that have accumulated on plate. Cover, reduce heat and simmer for 20-25 minutes, until chicken is cooked through.

6. Add chopped spinach and simmer, uncovered, for 5 minutes. Pour in cornstarch-water mixture, stirring to distribute, and cook until sauce is thickened, about 1 minute. Season to taste.

7. While you're simmering, transfer the chickpea puree to a saucepan over low heat and heat through. Season to taste. Serve puree topped with the chicken, sprinkled with crispy shallots. Top with some of the thickened sauce. Delish!

Digg Technorati Delicious StumbleUpon Reddit BlinkList Furl Mixx Facebook Google Bookmark Yahoo

Wednesday, May 20, 2009

White Bean Dip: Both Amazing and Easy

I can't stop eating this dip. I'm already plotting to make more. It's creamy and flavourful and garlicky without being overpowering. It's also low-fat and low-carb, if you care about such things. It's very high-yum and high-protein and high-ly likely to be devoured before I can finish writing this post.


You need:

1.5 cups cooked white beans, like navy beans*
1 head of garlic
4 tbs olive oil
1/2 tsp coarse sea salt
1/4 cup finely diced red onion
2-3 tsps lemon juice

* Look, it's really really easy to cook your own dried beans from scratch and it's quite a bit cheaper. It takes about 4 hours and you don't have to stand there the whole time. Make a bunch and freeze them in baggies. If you don't believe there's a difference, take my word for it. If you always hated beans, try making your own. They are amazing. Cans are for jerks. <--- Please note, this is a rant. Do not take it too seriously. A bit seriously, but not too seriously.

1. Roast your garlic. Preheat your oven to 400ºF and slice off the very top of your head of garlic. Do not separate the individual cloves! Leave it whole! Place the whole head in a piece of aluminium foil and drizzle with 1 tbs of olive oil and a pinch of the sea salt. Wrap up the garlic head in the foil and put it in the oven for 30-35 minutes.

2. Put the rest of the ingredients in a food processor. When the garlic is done, let it cool, then squish all (yes all) the cloves out of their skins by squishing the head of garlic from the bottom. Add the garlic to the food processor, too. Mmm garlic.

3. Process/blend the dip until it's creamy. You may need to adjust the lemon juice or salt to your taste - this is just my taste. Serve with toasted pita or veggie dippers!

Digg Technorati Delicious StumbleUpon Reddit BlinkList Furl Mixx Facebook Google Bookmark Yahoo

Tuesday, May 19, 2009

My absence

I was away for five days, kicking up my heels on the east coast! I'll be back to cooking and baking soon, but for now, here are some photos to keep you drooling.

While we were in Halifax we had two really good meals. The first was at the brew-pub, The Split Crow. They stock local brew and cook a mean dinner. Friendly service, too! The photos below are from our meal there:

First, a delicious seafood chowder with lobster, haddock, and potatoes:


Please note the delicious lobster claw left whole in the chowder: mmmmmmmmmmm!

And then a plate of local-beer battered haddock with hand-cut chips, and a pint of India Pale Ale to wash it down.
Crispy batter, moist fish, delicious fries, and home-made tartar sauce. Malt vinegar may also have played a role.


The other delicious meal we had was at Little Fish, which is a little more upscale and a bit pricier, but very much worth it. They showcase Nova Scotian wines, which were actually quite tasty, at least the one we sampled! Again, great friendly service and fantastic food. Some of our party had whole lobster, but I had lobster-stuffed haddock with dauphinoise potatoes and fresh, local asparagus, which was perfectly cooked. The pan-fried haddock with capers was also delicious.

They also have an even more upscale dining room called The Five Fishermen, which we didn't get to try out because of an electrical outage.

Digg Technorati Delicious StumbleUpon Reddit BlinkList Furl Mixx Facebook Google Bookmark Yahoo

Saturday, May 9, 2009

EPIC RAINBOW CAKE OF NOM!

The rainbow cake has been spreading through the foodblogosphere like butter on a hot roll since at least January - that's when I heard about it from The Omnomicon. I've been waiting for an opportunity to use my gel food colours, thinking of this cake, and thinking that perhaps my own birthday might be the occassion for their inaugural use. But then a party was announced and Roxy became the lucky recipient of a magical six-layer rainbow cake.

The idea is fairly simple but keeping a six-layer cake level and in one piece, especially when serving, is hard to execute. I am by no means a proficient cake-maker, but I like cake, and I feel like that is half the battle. It's not the half that makes your cake stand up straight, though, I discovered.

You need:
  • 2 batches of the cake recipe of your choice! It should be a white cake so that the colours stand out well. You can even use two box mixes! But, if you do this, I recommend adding two boxes of vanilla pudding (dry) to the mix - you'll end up with a richer, more structurally sound cake.
  • red, yellow, green, and blue GEL food colours. I don't recommend using liquid food colours as you'll have to add too much and the cake consistency will change.
  • icing recipe of your choice - you will need a LOT of icing. More than you think. Again, feel free to use disgusting canned icing.
  • decorations of some sort! icing of various colours and/or a piping bag will do the trick.

1. Mix your batter according to the directions. Measure the volume of the batter and divide that number by 6 for your six layers. I ended up needing 1 and 1/3 c of batter per colour as I had 8 cups of batter total. Preheat your oven to the indicated temperature. Grease six 8" cake pans well.

2. Divide the batter into 6 glass or ceramic bowls. Plastic might take some of the colour from the food dye - I'd be careful. Add a few drops of gel food colouring to each bowl, according to the colour you want, and mix well. I needed three drops for red, 2 drops of yellow and one drop of red for orange, three drops of yellow for yellow, two drops for green, three drops for blue, and two drops of blue plus two drops of pink for purple.


3. Pour each colour of batter into a cake pan, and bake! Mine took 20 minutes to be done through.


4. Let the cake cool for a long time. The cake must be cool before you start assembling your cake or it will be fail cake. While you're waiting, make your icing. My recipe is a few tbs of butter, a bag of icing sugar, a tbs of vanilla, and enough milk to make it icingy.

5. Using a sharp cerated knife or cake leveller, level off the tops of the cakes. They must be flat or your cake will fall over. Put the purple layer on the tray you're going to serve it on. Tuck a few pieces of parchement paper underneath so that no icing will get on the serving tray. You'll tug them out later when you're done icing. Ice the top but not the sides of the purple layer. Stack the blue layer on top, and ice its top. Repeat with green, yellow, orange, and red.


6. When you get to red, pile lots of icing on the top and spread it evenly, pushing it over the edges. Then ice the sides. Now you can decorate the cake however you like - those icing scribblers they sell are useful for this, or you can put chocolate chips or sprinkles or whatever! I like to make mine as garish as possible. :)


7. Tug out the parchment pieces, and serve your beautiful cake to your adoring fans!


Digg Technorati Delicious StumbleUpon Reddit BlinkList Furl Mixx Facebook Google Bookmark Yahoo

Friday, May 8, 2009

Herb-crusted White Fish


This is sort of the antidote to the last post: fresh, healthy, and bursting with flavour. It was a bit labour intensive, since Quebec apparently does not believe in the selling of anchovy paste, and sells only the whole fillets - I ended up having to make my own.

The recipe is, once again, from Serious Eats' column, Dinner Tonight. It calls for three different fresh herbs, lovely red onions, and salty, tasty anchovies. All together, the taste is rich without being heavy, and the combination of fresh herbs brightens the flavour of the fish rather than overpowering it. I almost left out the mint because I'm not usually a big fan, but I'm really glad I kept it in. It really made the dish.

The only thing I changed from the recipe was the type of fish. Atlantic Cod stocks are very low. If you can, you should choose a more sustainable firm, white fish for this recipe. Here's a guide.

Here's the recipe, copied from Dinner Tonight:

1 medium or 1/2 of a large red onion
2 tablespoons olive oil
1 tablespoon red wine vinegar
12 to 16 ounces firm white fish fillet, cut in 3 to 4-ounce portions
1/2 teaspoon anchovy paste*
3 tablespoons dried breadcrumbs
3 or 4 sprigs fresh, flat-leaf parsley
8 to 10 fresh mint leaves
3 or 4 large fresh basil leaves
Salt and freshly ground pepper to taste
1/2 cup dry white wine or water
10 to 12 oil-cured black olives, cracked and pitted


*If you want to make your own anchovy paste, blend a tin of anchovies with 2 cloves of garlic, 1 tbs of wine vinegar and some of the oil from the can in a food processor until it is a paste. Easy.


Procedure

1. Preheat the oven to 400°F.

2. Cut the onion into quarters, then cut the quarters crosswise and separate the layers to create wide, square slices. In a sauté pan, heat 1 tablespoon of olive and add the onion. Season with salt and pepper, and sauté over low heat until the onion has wilted and started to turn translucent; be careful not to let it brown. Add the red wine vinegar to the pan and shake it briefly, then transfer everything to the bottom of a medium-sized baking dish.

3. Wipe the pan with a paper towel to clean it, then place it back over low heat and add the remaining tablespoon of olive oil. Add the anchovy paste and stir with a wooden spoon to dissolve the paste into the oil. Dump the breadcrumbs into the pan and stir to completely coat them with the oil. Transfer the breadcrumbs to a small bowl to cool slightly.

4. Wash the herbs, pat them dry, and finely chop them. Add them to the bowl with breadcrumbs, and season everything with a small pinch of salt and a few grinds of black pepper.

5. Lay the portioned fish on top of the onions and season with a bit more salt and pepper. Distribute the breadcrumb-herb mixture evenly on top of the fish. Add the white wine or water to the pan and scatter the olives around the dish.

6. Bake the fish for 15 to 20 minutes, depending on the thickness of the fish; it should be cooked through but still moist; check the pan after 10 minutes and add a bit more water or wine if necessary.

7. Serve immediately, with the some of the onions, olives and pan juices spooned alongside the fish.


Digg Technorati Delicious StumbleUpon Reddit BlinkList Furl Mixx Facebook Google Bookmark Yahoo

Wednesday, May 6, 2009

Review: Campbell's Cream of Chicken Easy Cooking Sauce

Campbell's has really been pushing these new "Easy Cooking Sauces" - their people shoved about 5 flyers with coupons through my door, and the grocery store was having a crazy sale on them all of last month. I got a carton for about 70 cents, I think.

Anyways, each carton comes with a little recipe to show you how to use the sauce. I got Mediterranean Chicken Rotini Bake on the back of mine.

Basically, you mix the sauce with spices and pasta, put some veggies on top, then chicken, cover with cheese, and bake for about an hour. As with all these ready-made soups and sauces, the sodium levels are through the roof. Each serving has 720mg, out of a daily max of 2300mg.

It's supposed to come out looking like this:

(photo from Campbells.ca)

You need:

1 carton (500mL) CAMPBELL'S Cream of Chicken Easy Cooking Sauce
2 cups uncooked whole wheat rotini
1/4 cup chopped fresh basil *
2 cloves garlic, minced
2 cups (1/2” / 1 cm dice) zucchini **
2 tbsp chopped pitted black olives
1 cup chopped plum tomatoes
4 boneless, skinless chicken breasts ***
1/2 cup shredded part-skim Mozzarella cheese
2 tbsp grated Parmesan cheese
Additional chopped fresh basil for garnish

Directions

  • 1. Combine cooking sauce, pasta, basil and garlic in shallow 2 qt (2 L) baking dish.
  • 2. Spread evenly with vegetables. Top with chicken. Sprinkle with cheeses. Cover.
  • 3. Bake at 400ºF (200ºC) for 50 minutes or until hot and bubbly. Remove cover and broil until cheese is golden and bubbly – about 3 minutes. Stir pasta, sprinkle with additional chopped fresh basil and let stand 5 minutes before serving.

* I used about twice this much basil, as I had some to get rid of.
** I didn't have enough zucchini so I made up the difference with some red and green peppers and a bit of brocolli
*** I think that a whole chicken breast is really a lot for one person, so for four people I used two and just cut each in half.


Verdict:


Meh. It was fine, but nothing to write a blog post about, or anything.

Even though I only cooked it for a total of 50 minutes, rather than the recommended 53, the zucchini were very mushy, and the chicken was quite dry. Despite the amount of sodium, the dish was not overly salty, which was good. As far as flavour, the sauce didn't disappoint; I tasted it before mixing it in with the pasta, and it was nice. But the end product was a bit bland and lacked something.

If I made this again, I would double the garlic, at least, and leave out the zucchini in favour of more peppers, which stood up a bit better to the long baking. I would also add a diced red onion.

Digg Technorati Delicious StumbleUpon Reddit BlinkList Furl Mixx Facebook Google Bookmark Yahoo

Tuesday, May 5, 2009

Balsamic-Glazed Roast Chicken


This recipe is from my dear friend over at The Pantry Collective. You should go visit her and see what yummy things she makes. I've been drooling over that and other recipes for a while, and I finally got the chance to make it! Verdict: Delicious!!

I didn't have some of what was needed, so I improvised a bit. You might notice some differences between her recipe and mine here. :)

You need:

a roasting chicken
1/4 cup balsamic vinegar
1/4 cup extra virgin olive oil
2 tbs honey
2 teaspoons coarse sea salt
1 teaspoon freshly ground black pepper
1 tbs thyme
1 tsp oregano
1 tsp basil
2 tsp rosemary
1 large lemon, juiced and zested, quarters reserved
8 cloves of garlic, peeled
4 small beets, peeled and quartered
4 medium carrots, peeled and cut in large pieces
2 medium onions, quartered

1. Wash your chicken, inside and out, and preheat your oven to 500ºF. Pat the chicken dry.
2. Combine the rest of the ingredients, save the last four, in a small bowl and mix.
3. Arrange your chopped veggies in the bottom of a roasting pan. Plop the chicken down in the middle.
4. Stuff the chicken with some onion quarters, the lemon quarters, and all of the garlic. Pour the sauce over the chicken, being careful to cover all the surfaces.
5. Roast the entire pan, veg and all, lowering the temperature to 400 after you put the pan in.


It shouldn't take more than about 90 minutes or so, although if you have included beets in your mixed veg, make sure you don't mistake beet juices for uncooked chicken juice, or vice versa. We ended up roasting ours for so long that the bones all fell away! However, despite our error, the chicken was so so juicy and delicious, and the vegetables retained their shapes. We ate it with steamed green beans and orzo. And plenty of wine.

Bonus: my sister holding the plate of chicken and veg. She is a brave lady for carrying that chicken while wearing a white silk blazer/vest.


Digg Technorati Delicious StumbleUpon Reddit BlinkList Furl Mixx Facebook Google Bookmark Yahoo

Friday, May 1, 2009

Everybody Let's Get Sconed!

The perfect scone is flaky and creamy, just held together by butter and magic. If I could get my hands on some clotted cream in this here town, I would be eating scones by the dozen, topped with cream and jam.


As it happens I only have butter, but I do have some home-made plum jam from the summer. So scones are allowed. They take about 30 minutes from start to finish, so if you're feeling lazy/pressed for time but still want a treat, this here's your answer.

Today I made two kinds: a plain, cream scone which is nice with tea and jam, and a chive scone for M because he likes oniony things and has a very tiny and furtive sweet tooth.

RECIPE THE FIRST: CREAM SCONES


2 c all purpose flour
1 tbs baking powder
1/2 tsp salt
2 tbs sugar
1/4 c + 1 tbs chilled butter, diced
1 c heavy cream

First, mix the first four ingredients well. Then cut in your butter until the mixture resembles crumbs. To cut in butter, you can use two knives or a pastry cutter and just slice through the flour and dough until it's mixed up.

Make a well in the centre and pour in your cream. Here's where things get a little tricky. Not too tricky though - don't give up! Mix the cream into the flour and butter mixture only enough so that you have a shaggy kind of dough. It doesn't have to be perfect, and in fact, should not look perfect unless you want rock hard scones. TOUCH THE DOUGH AS LITTLE AS POSSIBLE.

Press the dough into a sort of rectangle shape, and cut it into evenly-sized triangles. Mine were about 3" by 4.5" by 5". I'm not sure if that's even possible... Pythagorus? Alternately, you can cut them into rounds with a glass or a biscuit cutter, but you'll lose some dough this way. Don't try to reform it - that falls into the category of too much touching.

Lay the scones out on a baking sheet, ungreased, and put them into an oven which has been preheated to 400ºF. They'll be done after about 10 minutes - very lightly golden on the edges, and milky everywhere else. Also, your kitchen will smell like heaven.


RECIPE THE SECOND: CHIVE SCONES!


Basically it's the same as the above, but with 1 tbs less sugar (so only 1 tbs) and you add in about 3 tbs finely snipped fresh chives with the flour and salt etc before you cut in the butter.

These are seriously amazing. The chive flavour is delicate but definitely present. They would be awesome with some sharp cheddar in there too.

Digg Technorati Delicious StumbleUpon Reddit BlinkList Furl Mixx Facebook Google Bookmark Yahoo